鸿蒙PC命令行适配】移植x264库到鸿蒙PC的完整教程(使用官方最新lycium_plusplus框架)
执行编译: cd lycium_plusplus ./build.sh -m x264 2.5 编译结果验证 查看输出产物: tree output/ 确认生成.so动态库文件。 集成到应用: 将产物拷贝至鸿蒙PC应用的libs/目录,在config.json中添加依赖即可使用。 3. 常见问题解决 3.1 编译报错:找不到头文件 原因:依赖未正确配置。 解决:在module.json中添加缺失的
哈喽小伙伴们好!前期猫哥已分享过几篇移植开源三方库和命令行到鸿蒙pc上的文章,使用了SDK外加修改脚本的方式实现。对新手来说稍微有点儿繁琐。好消息是官方推出了最新的移植三方库的框架lycium_plusplus。
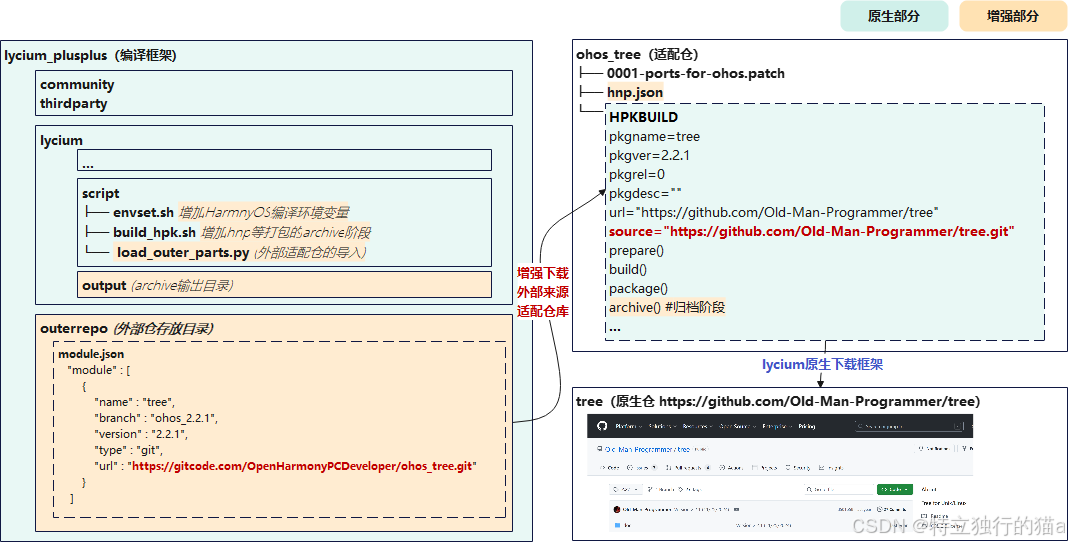
目前为鸿蒙PC移植C/C++库(如x264)主要有三种编译方法,下面分别介绍其核心逻辑和适用场景。并且主要推荐下官方最新lycium_plusplus框架,使用它,移植三方库就像搭积木一样简单,只需按图索骥,修改对应信息即可。
1. 编译方法对比
1.1 第一种:build(已弃用)
- 核心逻辑:通过
build.sh脚本配置环境变量(工具链路径、clang、cmake等),再编写build_ohos.sh编译脚本进行移植。 - 仓库地址:https://gitcode.com/OpenHarmonyPCDeveloper/build
- 现状:官方已停止维护,迁移至lycium_plusplus框架。
- 适用人群:新手(仅作历史参考)。
1.2 第二种:lycium_plusplus(推荐)
- 定位:OpenHarmony官方C++编译框架,支持依赖管理和一键编译。
- 仓库地址:https://gitcode.com/OpenHarmonyPCDeveloper/lycium_plusplus
- 优势:
- 集成依赖包,自动处理库间依赖关系。
- 提供标准化移植模板,降低开发门槛。
- 适用人群:大多数开发者的首选,需具备基础问题排查能力。
1.3 第三种:自制轮子
- 核心逻辑:将ohos-sdk作为独立工具链,手动调用clang/cmake等工具移植。
- 优势:灵活可控,适配复杂定制需求。
- 适用人群:
- 有嵌入式Linux/Android NDK交叉编译经验的开发者。
- 熟悉C/C++编译流程的资深工程师。
方法选择建议
| 方法 | 适用场景 |
|---|---|
| build | 已弃用,仅作历史参考 |
| lycium_plusplus | 推荐!适合大多数开发者,标准化流程降低移植难度 |
| 自制轮子 | 资深开发者,需手动处理依赖和编译参数 |
2. 使用lycium_plusplus移植x264库 示例
2.1 环境准备(Ubuntu 24.04)
安装基础开发工具:
sudo apt update
sudo apt install -y git curl cmake ninja-build gcc g++ make autoconf automake libtool yasm nasm
2.2 配置ohos-sdk
-
创建工作目录:
mkdir ~/myprj && cd ~/myprj -
下载ohos-sdk:
wget https://cidownload.openharmony.cn/.../ohos-sdk-full_ohos.tar.gz # 替换为实际下载链接 tar xf ohos-sdk-full_ohos.tar.gz -
解压工具链:
cd ohos-sdk/linux unzip -q native-linux-x64-*.zip unzip -q toolchains-linux-x64-*.zip -
设置环境变量:
export OHOS_SDK=~/myprj/ohos-sdk/linux
echo 'export OHOS_SDK=~/myprj/ohos-sdk/linux' >> ~/.bashrc  # 永久生效
2.3 获取lycium_plusplus框架
cd ~/myprj
git clone https://gitcode.com/OpenHarmonyPCDeveloper/lycium_plusplus.git
2.4 移植x264库
- 添加x264移植配置文件:
- 修改
lycium_plusplus/external_deps/下的module.json,
增加以下配置:
- 修改
,
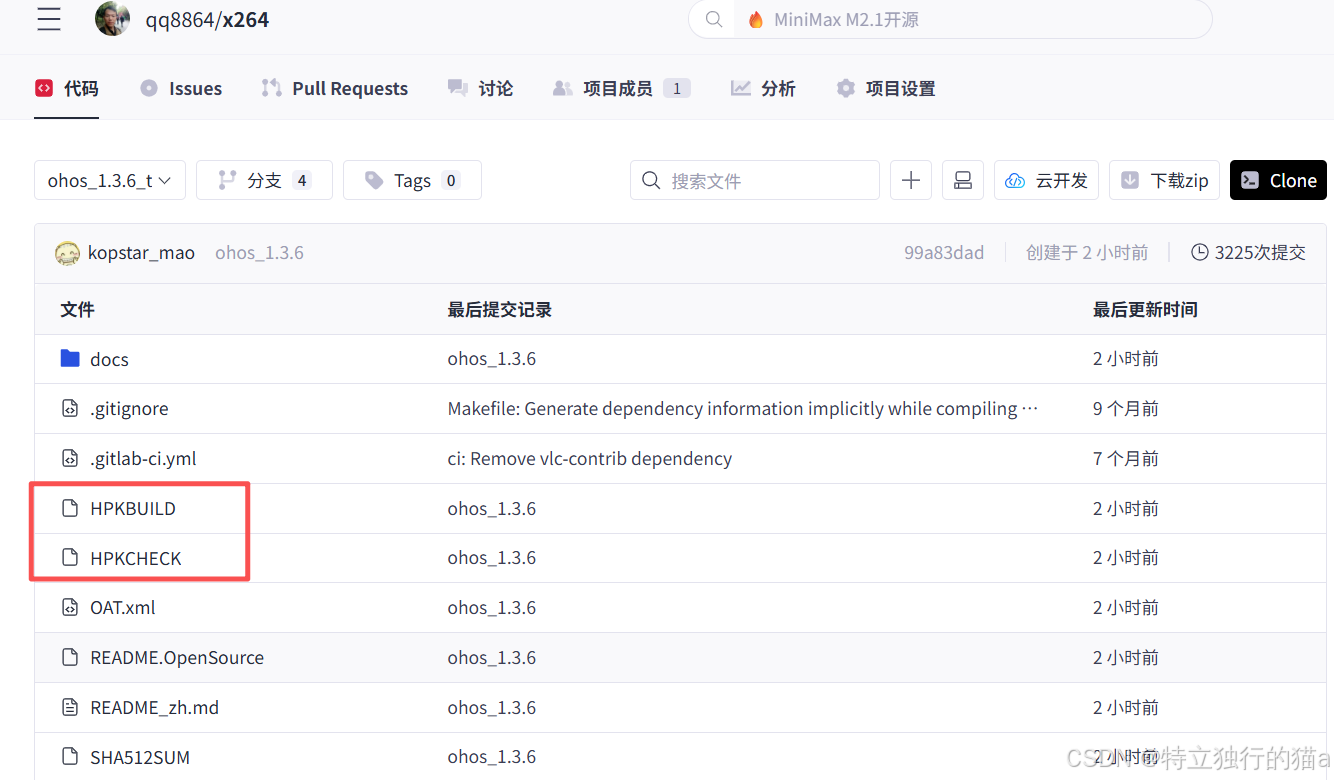
{
"name" : "x264",
"branch" : "ohos_1.3.6_t",
"version" : "1.3.6",
"type" : "git",
"url" : "https://gitcode.com/qq8864/x264.git"
}
其中branch是你的git仓库的分支名,url是你的要移植的项目的git仓地址。
2. 按规范编写移植文件(示例):
可以看到,我的要移植的git仓里连源码的影子都没有,这也是官方推荐的规范。
无需去fork仓库源码,那样反倒容易意外修改引起其他问题不利于工程化。
关键就在于配置HPKBUILD文件:
HPKBUILD文件内容如下:
# Copyright (c) 2023 Huawei Device Co., Ltd.
# Licensed under the Apache License, Version 2.0 (the "License");
# you may not use this file except in compliance with the License.
# You may obtain a copy of the License at
#
#     http://www.apache.org/licenses/LICENSE-2.0
#
# Unless required by applicable law or agreed to in writing, software
# distributed under the License is distributed on an "AS IS" BASIS,
# WITHOUT WARRANTIES OR CONDITIONS OF ANY KIND, either express or implied.
# See the License for the specific language governing permissions and
# limitations under the License.

# Contributor: Jeff Han <hanjinfei@foxmail.com>,Tao Han <hantao_ya@163.com>
# Maintainer: Jeff Han <hanjinfei@foxmail.com>

pkgname=x264
pkgver=stable
pkgrel=0
pkgdesc="x264 is a free software library for encoding H.264/MPEG-4 AVC video streams. It is one of the most popular video compression libraries in the world and is used worldwide for applications such as web video, TV broadcasting and Blu-ray authoring."
url="https://code.videolan.org/videolan/x264"
archs=("armeabi-v7a" "arm64-v8a")
license=("GNU GENERAL PUBLIC LICENSE V2.0")
depends=()
makedepends=()

source="https://code.videolan.org/videolan/$pkgname/-/archive/$pkgver/$pkgname-$pkgver.tar.gz"

autounpack=true
downloadpackage=true
buildtools="configure"

builddir=$pkgname-$pkgver
packagename=$builddir.tar.gz

source envset.sh
host=
prepare() {
 #拷贝两份,不污染源码目录
 cp -rf $builddir $builddir-$ARCH-build
 if [ $ARCH == "armeabi-v7a" ]
 then
     setarm32ENV
     host=arm-linux
 elif [ $ARCH == "arm64-v8a" ]
 then
     setarm64ENV
     host=aarch64-linux
 else
     echo "${ARCH} not support"
     return -1
 fi
 export AS=$CC
}

build() {
 cd $builddir-$ARCH-build
 PKG_CONFIG_LIBDIR="${pkgconfigpath}" ./configure "$@" \
 --host=$host --enable-shared --enable-static > $buildlog 2>&1
 $MAKE VERBOSE=1 >> $buildlog 2>&1
 ret=$?
 cd $OLDPWD
 return $ret
}

package() {
 cd $builddir-$ARCH-build
 $MAKE install >> $buildlog 2>&1
 cd $OLDPWD
 unset host
 if [ $ARCH == "armeabi-v7a" ]
 then
     unsetarm32ENV
 elif [ $ARCH == "arm64-v8a" ]
 then
     unsetarm64ENV
 else
     echo "${ARCH} not support"
     return -1
 fi
}

check() {
 echo "The test must be on an OpenHarmony device!"
}

# 清理环境
cleanbuild() {
 rm -rf ${PWD}/$builddir $builddir-armeabi-v7a-build $builddir-arm64-v8a-build #${PWD}/$packagename
}
对于移植者来说,需要做的事情呢就是按图索骥,依照上述我的示例,去配置下待移植的库的信息和原始项目代码的url路径。
3. 启动编译:
当上面信息配置好后,接下来就可以执行编译啦:
cd lycium_plusplus/lycium/
./build.sh x264  # 调用框架编译x264
编译报错解决: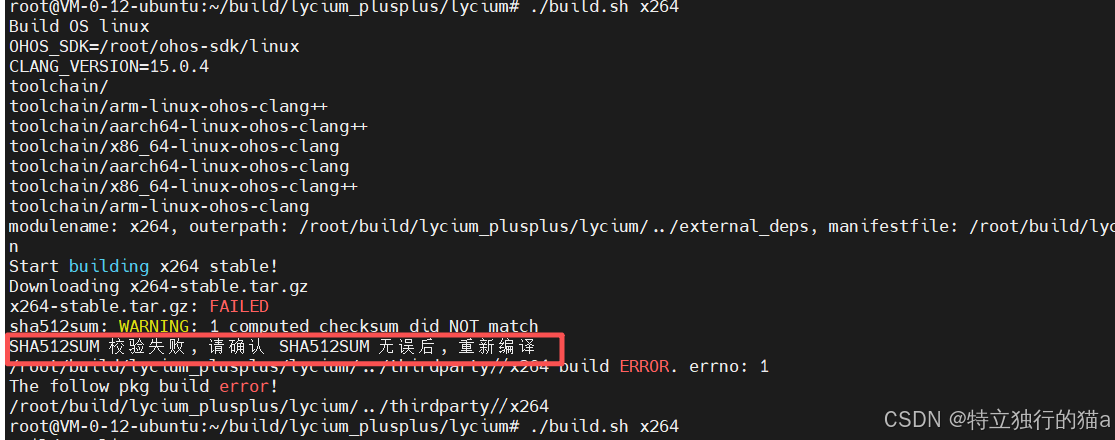
这个错呢,不知道是不是官方脚本验证逻辑的bug,还是说从三方下载的库呢不规范。解决办法也是有的,可以修改下官方脚本lycium/script/build_hpk.sh的191行代码:

改为如下形式:
buildlog=
publicbuildlog=
builpackage() {
    donelist=($*)
    builddepends "${donelist[*]}"
    if [ $? -eq 101 ]
    then
        echo $pkgname" not ready. wait "${newdeps[*]}
        for dep in ${newdeps[@]}
        do
            echo $dep >> ${LYCIUM_DEPEND_PKGNAMES}
        done
        exit 101
    fi
    echo "Start building $pkgname $pkgver!"
    if [ ! $downloadpackage ] || [ $downloadpackage != false ]
    then
        sure download $source $packagename
        if [ -f "SHA512SUM" ]
        then
            # 判断新下载的源码压缩包正确性。如果失败退出编译,不删除,下载的压缩包
            checksum SHA512SUM
            ret=$?
            if [ $ret -ne 0 ]
            then
                echo "SHA512SUM 校验失败!"
                # 191行 增加修改的部分
                read -p "是否忽略错误继续执行?(输入 'y' 继续,其他任意键退出): " confirm_continue

                # 檢查用戶輸入是否為 'y' (不區分大小寫)
                if [ "$confirm_continue" != "y" ] && [ "$confirm_continue" != "Y" ]; then
                    echo "用户选择退出。中止编译。"
                    exit $ret
                else
                    echo "用户选择继续执行,跳过校验错误。"
                fi
            fi
        fi
    fi
3. 验证移植结果
在lycium_plusplus/lycium/usr目录下,是最终生成产物的路径。
编译成功后检查以下输出:
-
生成文件:
- 静态库:
$LYCIUM_OUTPUT_DIR/usr/x264/arm64-v8a/lib/libx264.a - 头文件:
$LYCIUM_OUTPUT_DIR/usr/x264/arm64-v8a/include/
- 静态库:
-
验证架构:
file $LYCIUM_OUTPUT_DIR/usr/x264/arm64-v8a/lib/libx264.a # 输出应为:ELF 64-bit LSB relocatable, ARM aarch64, version 1 (SYSV) -
生成HNP包:
- 在
output/arm64-v8a/目录下查找x264.hnp安装包。
- 在
注意:在lycium_plusplus/lycium/usr/路径下面有个hpk_build.csv文件,
记录了编译成功的库的信息如:
muslc_gext,1.0.0,arm64-v8a
tree,2.2.1,arm64-v8a
openssl,3.6,arm64-v8a
yara,4.5.0,armeabi-v7a
bzip2,1_0_6,armeabi-v7a
bzip2,1_0_6,arm64-v8a
bzip2,1_0_6,x86_64
x264,stable,armeabi-v7a
x264,stable,arm64-v8a
如果想重新编译某个库,只需删除对应的上面的记录即可。
4. 常见问题解决
- 问题1:汇编优化未启用
方案:在configure时添加--enable-asm参数。 - 问题2:依赖nasm/yasm缺失
方案:确保已安装nasm(sudo apt install nasm)。 - 问题3:工具链路径错误
方案:检查$OHOS_SDK环境变量是否指向ohos-sdk/linux。
5. 总结
通过lycium_plusplus框架,我们完成了x264库的鸿蒙PC移植:
- 标准化流程:环境配置→源码编译→生成HNP包。
- 关键步骤:
- 正确配置ohos-sdk工具链。
- 编写移植脚本指定交叉编译参数。
- 验证生成的ARM aarch64架构库文件。
- 扩展建议:
- 需动态库时修改
configure的--enable-shared参数。 - 复杂项目可参考框架内其他库(如ffmpeg)的依赖管理。
- 需动态库时修改
提示:完整移植代码参考 我的x264仓 的
qq8864/x264目录。
移植效果示意图:
图:x264库成功编译输出libx264.a及hnp包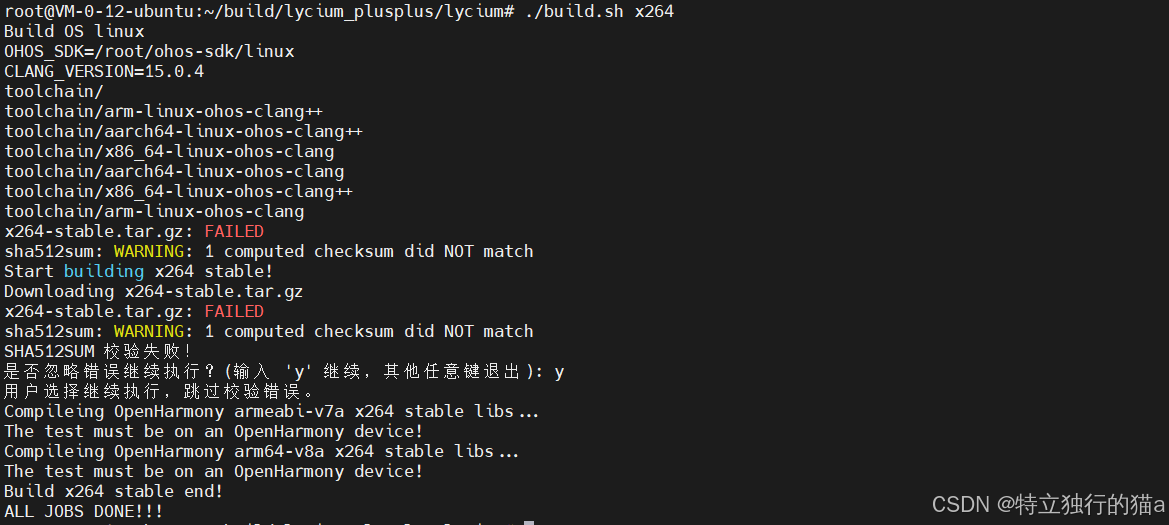
参考链接
https://blog.csdn.net/g310773517/article/details/156458831

赋能鸿蒙PC开发者,共建全场景原生生态,共享一次开发多端部署创新价值。
更多推荐

 11
11 0
0- 0


 已为社区贡献8条内容

所有评论(0)